Tips for the New Motorcycle Owner
I got my first bike in May, 2007, and was lucky enough to have two very
experienced riders help me in bike selection and preparing for camping
on the bike. I bought a brand new bike, a 2007 Suzuki V-Strom 650
(model DL650). (If you're buying a new bike, I recommend paying for the
report of what dealer cost is. I saved about $800 by doing that. I
think I got mine from http://www.cyclebuy.com/invoice.htm
)
I took the California Motorcyclist Safety Program (CMSP) (http://www.ca-msp.org/)
Basic
Rider Course
so I wouldn't have to take the driving part of the test to
get my license. Great class and I learned a lot, but not much about
driving at speeds above 25 mph. Which is nice, because it's easy to
fall over at low speeds.
There were quite a few things I still hadn't learned that are no doubt
second-nature to experienced bikers. Here are the ones I can remember, two years
later. I know you're going to be thinking "DUH!" after reading most of these.
Better to be saying "DUH!" now than right after you have the bike fall over.
Pushing the Bike
Keep this in mind: The bike is weightless when exactly upright, and
gets heavy real fast when
it starts to lean over. The goal, then, is to keep the bike as
close as possible
to directly upright at all times. Don't be afraid to move SLOWLY. That was my
first brainstorm. I wanted to look cool and experienced, but luckily I wanted
more not to drop the bike. So I took it easy and kept an eye on other riders,
and most of them keep things nice and slow when they're maneuvering into a
parking space, getting on the bike, starting off, etc. You'll learn pretty
quickly that when you see somebody trying to do any of that fast, they're a
newbie.
Most
people seem to feel that standing next to the bike and holding both
sides of the handlebars with both hands gives them the most control
over the bike. I say that because that's the way guys at the motorcycle shop
always move bikes around. Maybe that's true for most people and most bikes, but
not for me. My
bike is a Suzuki V-Strom 650 (model designation DL-650).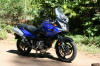 It's a rather
tall bike with an upright riding position, good for long-distance
touring. I'm 5'10" tall with I'd guess average leg length for that
height, and I have to stand on my toes a bit to reach the ground while
straddling this bike. As a result, I have to be a bit more vigilant
about what I do with the bike to avoid tipping over. If your bike is
lower, and most are, maybe you can get away with being a little more casual
about how you move your bike around. But for me, I like to keep the thing
resting lightly on my hip when I push it around, just so it doesn't get away
from me and fall over on the opposite side.
It's a rather
tall bike with an upright riding position, good for long-distance
touring. I'm 5'10" tall with I'd guess average leg length for that
height, and I have to stand on my toes a bit to reach the ground while
straddling this bike. As a result, I have to be a bit more vigilant
about what I do with the bike to avoid tipping over. If your bike is
lower, and most are, maybe you can get away with being a little more casual
about how you move your bike around. But for me, I like to keep the thing
resting lightly on my hip when I push it around, just so it doesn't get away
from me and fall over on the opposite side.
When
I bring my bike out of the garage, I have to back it out up a slight
incline. There's no way I can sit on it and push with my feet to get it
up the incline. And it's too tall for me to JUST hold the handlebars
and keep it under control. So I stand next to it, holding the
handlebars with both hands, letting the bike lean slightly against my
hip as I walk it back. I have to go slow to make sure the bike doesn't
lean into me TOO much, because it gets real heavy if I do. And I can't
let it lean AWAY from me, because I'm not tall enough to bring it back
if it starts to tip over away from me.
Putting the Bike Up on the Center Stand
You can do this starting with the bike resting on the side stand, BUT,
before you take the bike off the center stand, be sure to put the
side stand back up!
This is a two-step process. First,
you want to bring the center stand down so it's lightly resting on the
ground but without any significant weight on it, and move the bike
side-to-side SLOWLY until it's settled over the center stand and both
"feet" of the center stand are in contact with the ground.
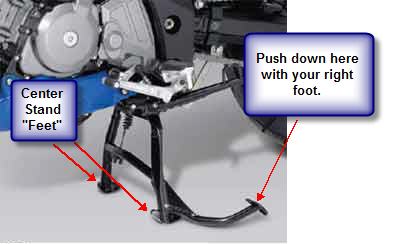
To do that, hold both
handlebars, or the left handlebar with your left hand and the left
seat rail with your right hand. Now push down lightly on the center stand with your right foot, and move the bike slowly and slightly
side-to-side until the center stand has both of its feet settled flat on the ground.
Once you're sure that the center stand is making stable
contact with the ground on both sides, now you're ready for step two.
With your right foot still on the center stand, keep your left hand on
the left handlebar, and if you haven't got it there already, grab the
left seat rail from underneath with your right hand. Now slowly shift
all of your weight to your right foot while lifting up on the seat
rail with your right hand. The bike should slowly rise up and
gently take it's position on the center stand.
Taking the Bike Down off the Center Stand
WARNING: Put up the side stand before
taking the bike off the center stand! If you don't, when the bike comes
off the
center stand it's going to depress the shocks and fall onto the side
stand, and then pop over to the opposite side.
Of
course, I know this from experience. It took me a while to figure out
what was happening, but I'm convinced now that the side stand was down
when I took the bike off the center stand. I've done this twice. I did
it once in my garage, and have holes in the drywall from where the
bike's mirror and handlebar end poked through when the bike fell over.
I did it again someplace in Northern California after lubing my chain.
At the time, I
hadn't yet discovered the better way to take the bike off the center
stand, so I'm sitting on the bike, rocking it forward and backward
until it comes off the center stand, at which point I grab the front
brake. So here goes: Rock, rock, rock, bike comes off stand, and then
immediately tips over to the right, into a cement picnic table.
Luckily, I was wearing my leather riding gloves and didn't scrape up my
hands too badly, and the bike didn't fall all the way over because it
landed on that table.
Adopt the same position as when putting the bike up on the center
stand, but instead of having one foot on the center stand, leave
both feet firmly on the ground, legs spread apart for
stability, left hand on left handlebar, right hand on left seat
rail. Again, make sure the
side stand is UP, out of the way, not down! Slowly push the bike
forward
until it comes off the
center stand.
Again, do NOT sit on the bike and rock until it falls off the
center stand and then try grabbing the front brake. If it's come only
part way off the stand when you grab the brake, you'll be perched on a
partly deployed center stand and probably too far off the ground to
support the bike with your legs. If your legs are plenty more than long
enough to reach the
ground, you might get away with this. In my case, my bike is too tall
for me to straddle flat-footed, so even an inch higher than normal is a
big problem for me.
Parking on Inclines
Once you've put the bike in a bad spot, it can be difficult to get out of it
without help and without tipping the bike over. It pays to think through these
scenarios BEFORE you plant the bike in one of them. One consideration is what
the side stand will want to do, the other is getting out of the parking space
once you've gotten yourself into it.
- If
there is a side-to-side incline, look for it to be minimal, and
rising from left to right (the bike will be leaning slightly more than normal)
rather than right-to-left (the bike isn't leaning as much onto the side stand,
or isn't leaning on the side stand at all). Either way, it's best not to have
much side-to-side incline because you don't want the bike leaning too much in
either direction. Too far to the left and it makes it difficult to lift it
back upright. Too far to the right and it won't stay on the sidestand and just
falls over immediately.
- If you have to park on a slope, try to park so that you're facing uphill, for two
reasons.
- One is that it will make the side stand want to stay down: if the
bike's facing uphill and resting on the side stand, gravity is trying to
make the bike roll backwards, which holds the sidestand in the deployed
position. Just make sure the slope isn't so steep that the sidestand just
slides on the pavement. On the other hand, if the bike's facing downhill
and there's much of a slope, it wants to roll right over the side stand,
the side stand retracts, and the bike falls over.
- The second reason for parking facing uphill is that it makes getting
out of the parking spot easier: if you drove in under power to wind up
facing uphill, then when you leave you can just sit on the bike and let it
roll backwards out of the spot. If you allowed the bike to roll backward
to back into the spot, then you get to drive out under power. On the other
hand, if you left yourself parked facing downhill, even if the sidestand
didn't retract on you, you're still left with moving the bike backwards
and uphill, without the aid of the motor (unless you have a bike with a
reverse gear), to get out of it. This can suck big if you have a tall bike
that's loaded down with gear. The first challenge is just standing next to
the bike, lifting it off the sidestand, and holding it while standing on
only one leg while you retract the sidestand with the other. And if you
survive that, you still have to push the bike backwards.
Parking on Soft Dirt or Sand
If you're going to be parking on soft dirt or sand, or even really hot
asphalt that can get soft, you'll want to have handy some kind of prop
for the
kickstand. You can look for a nice rock or piece of wood somewhere
nearby, but what to do with the bike while you pick up that object?
When I'm camping, I have a tank bag, and in there I keep an old soda
can that I've smashed from top to bottom into a disk. That works pretty
well -- I drop it on the ground as close to where I want to put the
kickstand, move it into final position with my foot while sitting on
the bike, and then lean the bike and kickstand onto it. The kickstand
makes contact, pushes the can down into the soft dirt a bit, and ...
then starts sliding off the can. Not an ideal solution, but I've been
able to make it work after a few tries.
My latest invention worked great! I have a few disks made of car tire
rubber, about 4" diameter and 3/8" thick, left over from an old project
at work. I attached some thin nylon cord, about 6' long, to one of
them. Now I can be sitting on the bike and drop the disk, and move it
into position with the cord. As I lower the kickstand onto it, the
kickstand "sticks" to the disk, and the disk slides on the soft dirt
until the bike is safely resting on it. The rubber, being tire rubber,
is really strong stuff, and while it does deflect some, it still does
the job. You probably don't have any such disks lying around your
garage. You might be able to make something similar with some 3/8" or
1/2" plywood, gluing some tire patch rubber onto one or both sides. I
think I'd only put the rubber on one side. That way, the kickstand is
guaranteed to stick to the rubber side, and the bare plywood side is
pretty much guaranteed to slide on the soft dirt as you lower the
bike's weight onto it.
Getting Ready to Ride - a Few Good Habits
- When you put your helmet on,
immediately
fasten the strap. Otherwise
you're likely to start off down the road and then notice it's not
fastened, and have to stop to do it. I've done this quite a few times
-- put the helmet on, put sunglasses on, zip the jacket ... pretty soon
I'm riding down the road and realize the helmet isn't strapped on. So
make it a habit: when the helmet goes on, the strap gets fastened.
- Put the key in the ignition
before
putting on your gloves. It's tough to get them out of your pocket with gloves on.'Course, you can take
the gloves back off, but it's a pain and you feel like an idjut.
- Zip all zippers, fasten wrist straps, etc.
before
starting off. You might be able to do something about many of those on the road, but the
left wrist strap is especially is hard to do anything about while
riding because it means taking your right hand off the throttle. I've done it -- if you
pull in the clutch, you can coast for a bit and maybe not become too
big a nuisance in traffic while you make an adjustment.
Maintenance Tips
Chain Adjustment and Lube
A chain stretches quite a bit when new. I think mine stretched
significantly over the first 2 or 3 thousand miles. I had to adjust it
at
about 600 miles, and several more times up to maybe 3000. Since then it
has been stable, I don't think I've adjusted it at all since about
5000.
As
for tools, you might want to consider buying some proper wrenches,
rather than relying on those in the tool kit. I don't know if my bike's
tool kit even has the right size wrenches to fit the axle bolt / nut,
but it certainly doesn't have big enough ones. I bought two wrenches,
one for each side of the axle, and put them under the seat. Makes
loosening and tightening the axle nut/bolt much easier.
I like the wax kind of lube, not oil. The brand I have is called Chain
Wax, from Maxima Racing Lubricants (http://www.maximausa.com/).
Their
website needs help, but there it is. Looks like they're in
Santee, near San Diego, CA, which is where I am, so maybe this stuff
isn't available everywhere. Anyway, I like the stuff because it's less
messy and seems to last
longer than oil. My owner's manual says to lube every 600 miles. I
probably go more like 1000.
Chain Lubing Tips
That
chain wax I recommend burns if left on your skin. So if you're out on
the road and lubing the chain, try to do it where there's soap and
water available. Or don't get any on your skin.
To lube the chain, make sure it's warmed up
by riding it for several miles. Then, if it's easy to take off the
chain guard (mine is only two screws), do that. Put the bike on the
center stand (this is why I bothered to pay all the money I paid to get
my center stand) so you can easily rotate the chain around its full
length. Get an old piece of cardboard (a piece of a twelve-pack drink
carton is nice) and tear it into a shape that you can slip behind
the chain while you're squirting on the lube. That'll keep you from
soaking tires and other undesirable targets. Apply the lube, and let it
soak in for a few minutes or more. I like to do this when I'm done
riding for the day, and just let it soak in and dry overnight.
Riding Tips
Get this book: "Sport Riding Techniques: How To Develop Real World
Skills for Speed, Safety, and Confidence on the Street and Track" by
Nick Ienatsch. Amazon has it.
Look far up the road, not at the pavement below you
It is
important to look for sand
and severe pavement irregularities, but minor bumps or cracks aren't
much trouble if you're not going at a speed near the limit. So go ahead
and quickly scan the near pavement surface for trouble, but look up
immediately and refocus on your intended path through the corner. Look
FAR up the road. I've been driving cars for 35 years, and I'm pretty
good at it. And I notice that when I'm driving a mountain road in the
car I am always focused on pretty much the farthest point of a corner I
can see. But on the bike, I've only been riding for two years, and I
STILL find myself too often looking just ahead of the front tire.
This is a terrible place to focus your attention, obviously. So
practice practice practice, at speeds well below the limit. It has
taken me quite a long time to be able to look far up the road and still
maintain good lane position, but it's essential to learn this skill.
Another difference between cars and motorcycles I've noticed is that on
a motorcycle, the faster you're going in a turn, the more the bike's
leaning. And the more the bike's leaning, the more sensitive it is to
steering input. Just the slightest movement of the handlebars has a
huge effect on your position in the lane. Practice practice practice,
and do it at a speed that won't get you killed.
Watch where you're going, not where you're at.
Watch the target path, not the obstacle to avoid.
Lean into the pavement; pavement is your friend. When you think you're
possibly going into a corner too hot, it seems instinctive to try to
sit up straighter and hold the bike up straighter, and that's the worst
thing you can possibly do. I had a racer tell me once that the most
common mistake people make is thinking the bike won't lean as far as it
will, and they crash on corners they could have made if they'd just
kept leaning.
When riding on uneven or dirt roads at low speed, where you might need to put
a foot down to support the bike, watch out for high mounds in the pavement or
dirt, especially if your bike, like
mine, is so tall that you can barely reach the ground with your feet. You don't want to have to stop with the bike
tires straddling a low spot,
leaving an extra long drop for your feet to reach the ground. I almost dumped my
bike in a campground this way.
On steep hairpins, be aware of transition between leaning and staying
atop the bike with the bike leaning and you not. Like parking lot style
where you stay atop and leave the bike upright or only slight lean
versus at speed where you and the bike lean. On really slow hairpins in
mountains, you can end up in transitioning and you don't want to find
yourself leaning with the bike when your speed drops below the point at
which that works.
Don't end up in a corner in neutral -- i.e. don't try to downshift
right at the beginning of a sharp hairpin and blow the shift and have
to coast. Coasting down a tight, steep hairpin having to rely totally
on brakes is not fun.
 It's a rather
tall bike with an upright riding position, good for long-distance
touring. I'm 5'10" tall with I'd guess average leg length for that
height, and I have to stand on my toes a bit to reach the ground while
straddling this bike. As a result, I have to be a bit more vigilant
about what I do with the bike to avoid tipping over. If your bike is
lower, and most are, maybe you can get away with being a little more casual
about how you move your bike around. But for me, I like to keep the thing
resting lightly on my hip when I push it around, just so it doesn't get away
from me and fall over on the opposite side.
It's a rather
tall bike with an upright riding position, good for long-distance
touring. I'm 5'10" tall with I'd guess average leg length for that
height, and I have to stand on my toes a bit to reach the ground while
straddling this bike. As a result, I have to be a bit more vigilant
about what I do with the bike to avoid tipping over. If your bike is
lower, and most are, maybe you can get away with being a little more casual
about how you move your bike around. But for me, I like to keep the thing
resting lightly on my hip when I push it around, just so it doesn't get away
from me and fall over on the opposite side.